


The Raspberry Pi is a great arcade gaming console, making sense to get the best arcade stick for Raspberry Pi. There are several arcade sticks on the market, so the decision can be pretty tricky. So, to find a good arcade stick that gives you hours of gaming fun, check out our suggestions for the best arcade stick for Raspberry Pi.
Table of Contents
- How to Choose the Right Arcade Stick for Raspberry Pi?
- EG-4P04 Review Summary
- Detailed Best Arcade Stick For Raspberry Pi Review
- Pros of EG Starts 4 Player Classic DIY Arcade Joystick Kit
- Cons of EG Starts 4 Player Classic DIY Arcade Joystick Kit
- Similar Models to EG Starts 4 Player Classic DIY Arcade Joystick Kit
- Frequently Asked Questions about the EG Starts 4 Player Classic DIY Arcade Joystick Kit
- Final Thoughts
How to Choose the Right Arcade Stick for Raspberry Pi?

Not all arcade sticks and buttons are the same. Besides its overall quality, the movements of an arcade stick, the style of its top, and the shape of the buttons vary depending on the type and schools of thought of the game.
Because of these differences, you should know why the manufacturers designed it to behave as they do. Once this is done, you can achieve the original machine’s goals and your performance improvements. With all that in mind, let’s analyze the differences.
A) Arcade Stick Style: American vs. Japanese
Two companies make the most popular styles of arcade stick and buttons: Sanwa and Happ. Also, they perfectly illustrate the differences between the Japanese (Sanwa) and American (Happ) styles.
- The Mortal Kombat machine will have Happ-style controls, while a Street Fighter machine will most likely have Sanwa. The differences are notable in both feel and look. Happ’s American-style controllers generally had bat-shaped tops and easy-to-grip controllers. Its buttons are generally concave and need firm pressure to reach the click phase.
- Unlike Happ, the buttons are generally flat and don’t require a lot of pressure to activate. However, Sanwa tends to use ball tops and looser action for its controllers. Additionally, Sanwa includes restrictor gates to the base of its arcade sticks to facilitate certain types of movement (such as flipping diagonals), which can be useful for platformers or fighting games. Other manufacturers imitate the feel and look of the Sanwa and Happ arcade sticks. They generally indicate which route they have taken by explicitly mentioning Sanwa or Happ or by including “Japanese” or “American” in the description.
![]()
B) Arcade Stick Shape

The tops of American arcade sticks tend to resemble a baseball bat, while Japanese bats tend to be more spherical.
- However, if your preference is the loose movement of a Japanese controller but like a bat-shaped top, you can make it happen. The tops of the joysticks are usually bolted connections; just twist them to remove and swap them.
- It’s important to note that just because an arcade stick has a bat-shaped top does not mean it is American – they’re generalizations.
![]()
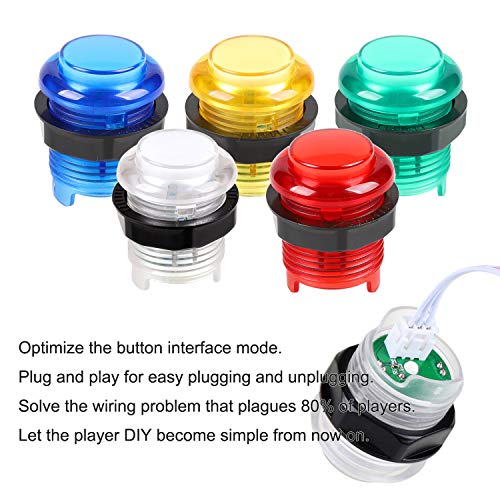
C) LEDs for Your Buttons
If you’re spending a little more, you can incorporate LEDs into your buttons. They look great, particularly in a low-lit room, but you will need to do some extra wiring to power them.
- Depending on your configuration, you may need to separately turn on the LEDs from the arcade machine. Of course, you can skip the LEDs (and save some money) if this all feels like too much work.
- Once you know what type of arcade sticks and buttons you need, all that’s left to do is choose the right set. However, if you go for a Japanese style, you may also require restrictor gates.
![]()
D) Restrictor Gates
When buying a Sanwa-style joystick, you may also want to consider a restrictor gate. They alter the feel of a joystick movement to better adapt to different game types.
- You can choose between an octagonal, 4/8, or round shape. If you’re just playing fighting games, you will want an octagonal shape.
- If you want to switch between platformers and fighting, choose the 4/8 option.
- The round-shaped option is the best of all options and can be helpful for some airplane or space simulators.
![]()
EG-4P04 Review Summary
The EG Starts 4 Player Classic DIY Arcade Joystick Kit is the best arcade joystick for Raspberry Pi. It is an American-style kit that supports 4/8 directional control. You get 8 white and black buttons and 8 blue, green, yellow, red, and 4-player buttons.

Positives
- Solid build quality
- Affordable
- Standard 8-button layout in a highly portable case
- 3 ft long cord
- The inputs work very well
Negatives
- There is no proper key lock switch for tournaments
- The base could use more non-slip handles
Detailed Best Arcade Stick For Raspberry Pi Review
The EG Starts 4 Player Classic DIY Arcade Joystick Kit is an easy-to-assemble, sturdy, and fun project for everyone, from beginners to professionals. The materials are made from high temperature-resistant plastic parts, resulting in a highly reliable and durable kit. In addition, the joystick and buttons are designed to deliver the best arcade action at the lowest price.
A) Features
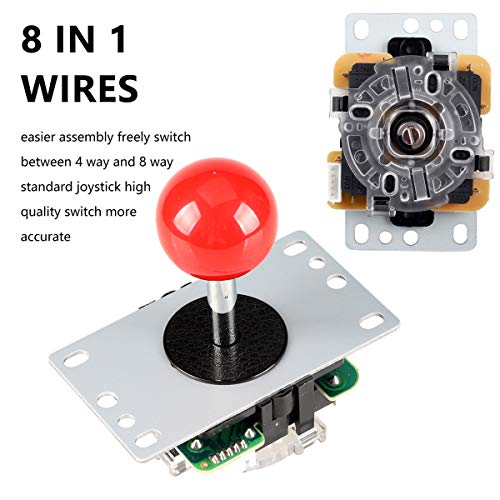
These “Happ-like” controls contain everything you need for a 4-player setup: 4 joysticks, 8 white and black buttons, and 8 blue, red, green, yellow, and four-player buttons.
- The black joysticks have large, bat-shaped heads and a switch that lets them support 4-way (like a platformer) or 8-way (like fighting) games.
- Just remember that the head is not interchangeable.
- The joystick design fits both wooden and metal control panels.
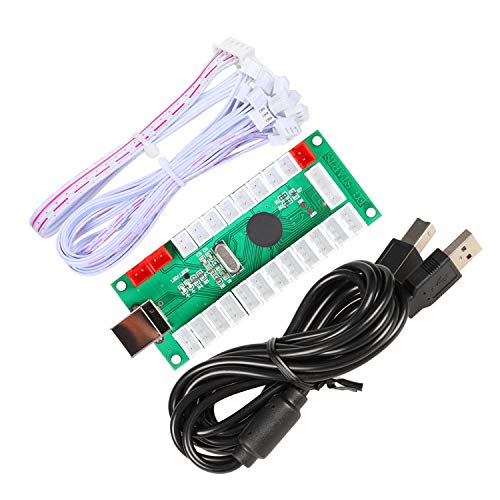
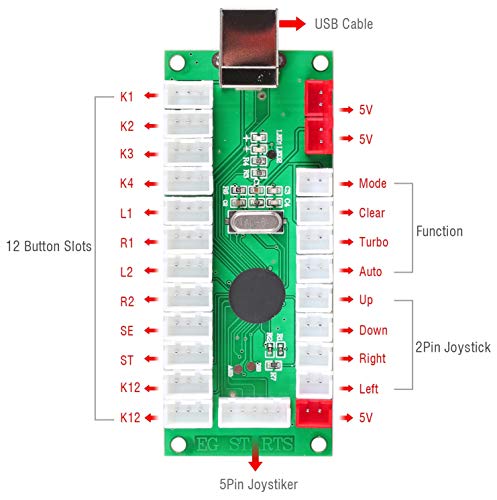
- The EG Starts GPIO interface for Raspberry Pi is included in the kit.
- The interface is compatible with the Raspberry Pi versions A+, B+, 2, 3, 3B+, 4, and is compatible with the remarkable SNESDEV drivers and is included in the RetroPie software package.
- This makes software setup a breeze – you might even have these setups already on your Raspberry Pi, so you can add them to the arcade joystick kit, and voila.
- You also get 40 LED push buttons, plus the USB encoders and cables needed to set everything up.
![]()
B) Ease of Use
Assembling the kit is simple and just needs a screwdriver; you do not require any soldering.
- The LEDs highlight your machine, particularly in low-lit situations.
- Simply plug the arcade stick and button connections into the USB encoder, and it will translate the signals into a code your computer (which is connected via a USB cable) can understand.
- The EG Starts 4 Player Classic DIY Arcade Joystick Kit is the best arcade joystick for Raspberry Pi. It is an American-style kit that supports 4/8 directional control.
![]()
Pros of EG Starts 4 Player Classic DIY Arcade Joystick Kit
- The design offers excellent value for your money.
- The rubberized head has a responsive grip.
- It comes with button stickers so you can label each button.
- The buttons are great for your average arcade games.
- It comes with everything you need and is easy to set up.
![]()
Cons of EG Starts 4 Player Classic DIY Arcade Joystick Kit
- The joysticks are indeed clicky.
- No mounting material is included.
- The USB controller could use better labeling paper or a diagram of the connections and joystick orientation.
![]()
Similar Models to EG Starts 4 Player Classic DIY Arcade Joystick Kit
There are many arcade sticks for Raspberry Pi that you can find one that meets your preference.
- We prefer the EG Starts 4 Player Classic DIY Arcade Joystick Kit because of its incredible responsiveness and feel.
- However, if you are looking for a Sanwa-styled entry point that works great with arcade games, we recommend the Hiking 2-Player LED DIY Arcade Kit.
![]()
Frequently Asked Questions about the EG Starts 4 Player Classic DIY Arcade Joystick Kit
Q: Can you make an arcade machine with Raspberry Pi?
A: Yes, you can make an arcade machine with Raspberry Pi. Here’s how to go about it.
What You Will Need?
For this build, you will need an RPi with a memory card, a Pimoroni Picade board, and a TFT screen with HDMI input, as well as a power supply and an HDMI cable. Also, get a panel mount joystick, which typically uses electrical buttons, microswitches, a USB power adapter with a micro-USB connector, and a USB-A to micro-USB cable. A 3.5mm audio jack and 4-ohm speakers are required for audio. A Wi-Fi dongle and a wireless keyboard come in handy for setting everything up once it is in your cabinet.
Install the Software
Power on your monitor and Raspberry Pi, then plug them with the HDMI cable. Next, install the software called RetroPie by following the instructions on GitHub. This will set up your Pi as a retro game emulator and allow you to put copies of video games or ROMs to play. The easiest way to add ROM is via a USB drive, as also described in this wiki.
Set Up the Cabinet and Controls
Connect the Picade board to your Raspberry Pi through USB. Next, connect your joystick and buttons to the Picade board after plugging them with a USB cable. The Raspberry Pi then interprets the joystick and button inputs as keystrokes. Next, connect the audio jack into the output port of the Raspberry Pi and the 3.5mm input jack on the Picade board, then connect your speakers to the adjacent screw terminals. Finally, connect a keyboard and the Ethernet/Wi-Fi if you are using it. Also, you can use a specially designed kit like the Picade for added convenience.
![]()
Q: How do I connect my Raspberry Pi to the arcade joystick?
A: You can connect your Raspberry Pi to the arcade joystick by following the steps below.
Step 1: Materials Needed
- Clear acrylic arcade joystick for Raspberry Pi.
- USB A male to male.
- HDMI Coupler
- HDMI cable
- OTG cable
- USB power supply
- Raspberry Pi Case
- Raspberry Pi 3 Model B.
- Original SANWA JLF joystick.
- Genuine Sanwa OBSF-30 30mm Snap Clasps.
Step 2: Configure Raspberry Pi
Before installing the Raspberry Pi on the arcade joystick, install your preferred software, be it Recalbox, RetroPie, or Lakka. They are all competent software for running emulators. Ensure to test the arcade joystick and everything with the Raspberry Pi before installing it in the arcade joystick enclosure.
Step 3: Placement
- Find the ideal place to place your Raspberry Pi where it won’t affect the buttons. Also, ensure to use the shortest and thinnest cables so they will fit. Organize all cables as well.
- Connect the OTG cable for power.
- HDMI cable for video output.
- Connect the USB of the arcade joystick to Raspberry Pi.
Step 4: Assemble
- Reassemble the enclosure making sure the cables are not pinched.
- Replace the four screws in the enclosure’s foreground.
Step 5: Finish
- Connect HDMI to your monitor.
- Connect the OTG cable to a USB-A male to male cable and then connect to a USB 5V 2A adapter.
![]()
Q: How do I configure my Raspberry Pi 4 controller?
A: To configure the game controller, go to the RetroPie menu on the emulation station and choose the “Configure RetroArch Joystick/Keyboard” option. Use the keyboard and choose the first option called “Configure Controller/Joystick “. Then follow the on-screen instructions to configure the controller.
![]()
Final Thoughts
The Raspberry Pi line of SBC (single board computers) is well suited for emulating arcade games. You can play most of your favorite arcade, portable, and home console games, 16-bit generation or earlier with a Raspberry Pi.
Since the Raspberry Pi is so perfect for work, we see many console projects using it. But you still require the right joystick to really recreate that classic gaming experience. So EG Starts is taking an interesting approach with its arcade sticks, which connect the Raspberry Pi to an arcade stick.
![]()


